Voice Assistant with ChatGPT on DFRobot ESP32 S3 AI Camera
Ever wished to create a voice-activated ChatGPT using a DFRobot ESP32-S3 AI camera? This blog is here to guide you through the entire process. We'll walk you through the steps to collect user commands via the built-in microphone, save the audio as a WAV file on an SD card, convert the audio to text using the Deepgram API, query OpenAI for responses, and print the answers in the serial terminal.
About the ESP32-S3 AI CAM
The ESP32-S3 AI CAM is an advanced camera module built around the ESP32-S3 chip, designed for video image processing and voice interaction. It excels in AI projects such as video surveillance, edge image recognition, and voice dialogue. The module features a wide-angle infrared camera for all-weather monitoring, ensuring clear images even in low-light conditions.

With a built-in microphone and speaker, it supports voice recognition and dialogue, making it ideal for smart home and IoT applications. Additionally, it can connect to the internet via Wi-Fi, enabling advanced tasks like image classification and natural language dialogue through cloud AI platforms.
Creating a Voice Assistant
My plan to create a voice assistant using OpenAI or DeepSeek support involves asking the ESP32 S3 AI Camera a question. The camera will capture our request through its built-in I2S PDM microphone and then save the recording to the SD card. We can then use DeepGram to convert the audio to text and then use OpenRouter to get the answers.
Getting Started
1. Insert the MicroSD card into the ESP32-S3 AI camera.
2. Install Arduino IDE: Download and install the latest version of the Arduino IDE from the official website.

3. Install Required Libraries: Open the Arduino IDE and install the necessary libraries.
Using Deepgram and OpenAI APIs
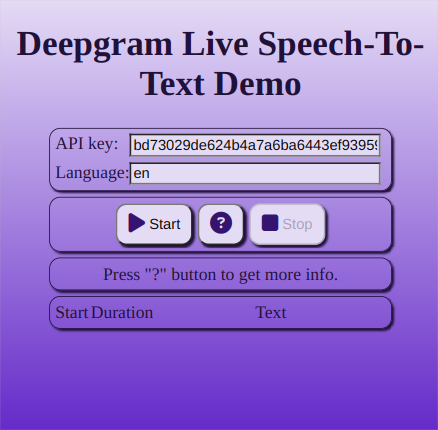
1. Sign Up for Deepgram API: Go to the Deepgram website and sign up for an API key.
2. Send Audio File to Deepgram: Use the provided code to send the WAV file to Deepgram API and convert the audio to text.

3. Sign Up for OpenAI API: Visit the OpenRouter website and sign up for an API key.
4. Send Text to OpenAI: Use the code to send the text to OpenAI API and print the response.
Final Steps: Combine the previous steps into a single codebase. After setup, open the serial terminal to view the response. The process involves connecting to the network, recording a 5-second audio, converting it to text using DeepGram, and querying OpenAI or DeepSeek.
Congratulations! You've successfully built a voice command ChatGPT using the OpenAI, DFRobot ESP32-S3 AI Camera, and Deepgram API. This guide provides a comprehensive walkthrough to help you create and customize your voice-activated AI assistant. Happy coding!
Feel free to experiment and add more features to your voice assistant. Share your projects and experiences with the community. If you have any questions or need further assistance, feel free to reach out.