Tutorial: Multi-Agent interactions with Autogen and Gemini — Part 4 ...
In this series, we have seen how to use the Autogen framework to create autonomous multi-agents that can communicate with each other. We also introduced a human element in the process, where a human can review the output of the Autonomous Agent and then take some decision based on that.
The series:
In our code samples so far, we have been using the Google Gemini models that are hosted online for the LLM. What if you would like to replace those by an open source model that you would like to run locally (yes — on your machine). In this part, we are going to see how to use Ollama, that helps us run one or more models where we want (in our case locally) and configure our agents to use that.
The installation steps are straightforward and involve downloading the Ollama environment locally and then pulling one or more models that can be run. Let’s go through the steps:
Simply visit and https://ollama.com/ and download the application for your environment. I have a MacOS machine and have downloaded the Mac distribution. Since running a local LLM requires a good amount of compute+memory, ensure that your machine specifications are good enough to run Ollama and at least one of the models.
Once installed, you will find that the Ollama application is available and you can run it via a terminal/command prompt as given under. This is expected since we have not yet downloaded (pulled) any model. If you do a $ ollama ls, you will not get any models listed.
Ollama supports a wide range of models. You can choose which model to download as per your requirements. Let’s go with one of the Gemma models, as we see below. I went with gemma.
When you click on gemma, you will see the details for that model and instructions on how to download and use the model.
In your terminal, give either the command ollama pull gemma or ollama run gemma. The latter will not just pull the model (be aware, it could take time since it's a few GBs and your internet speed will decide how long it's going to take) but also run an interactive command line shell, where you can talk to the model.
Validate that the entire process was done correctly, as follows:
Launch the Ollama interactive shell with the specific model that you downloaded:
This will bring up the interactive shell, where you can try out a few prompts. Ensure that this is indeed working because it is important to have this setup correctly.
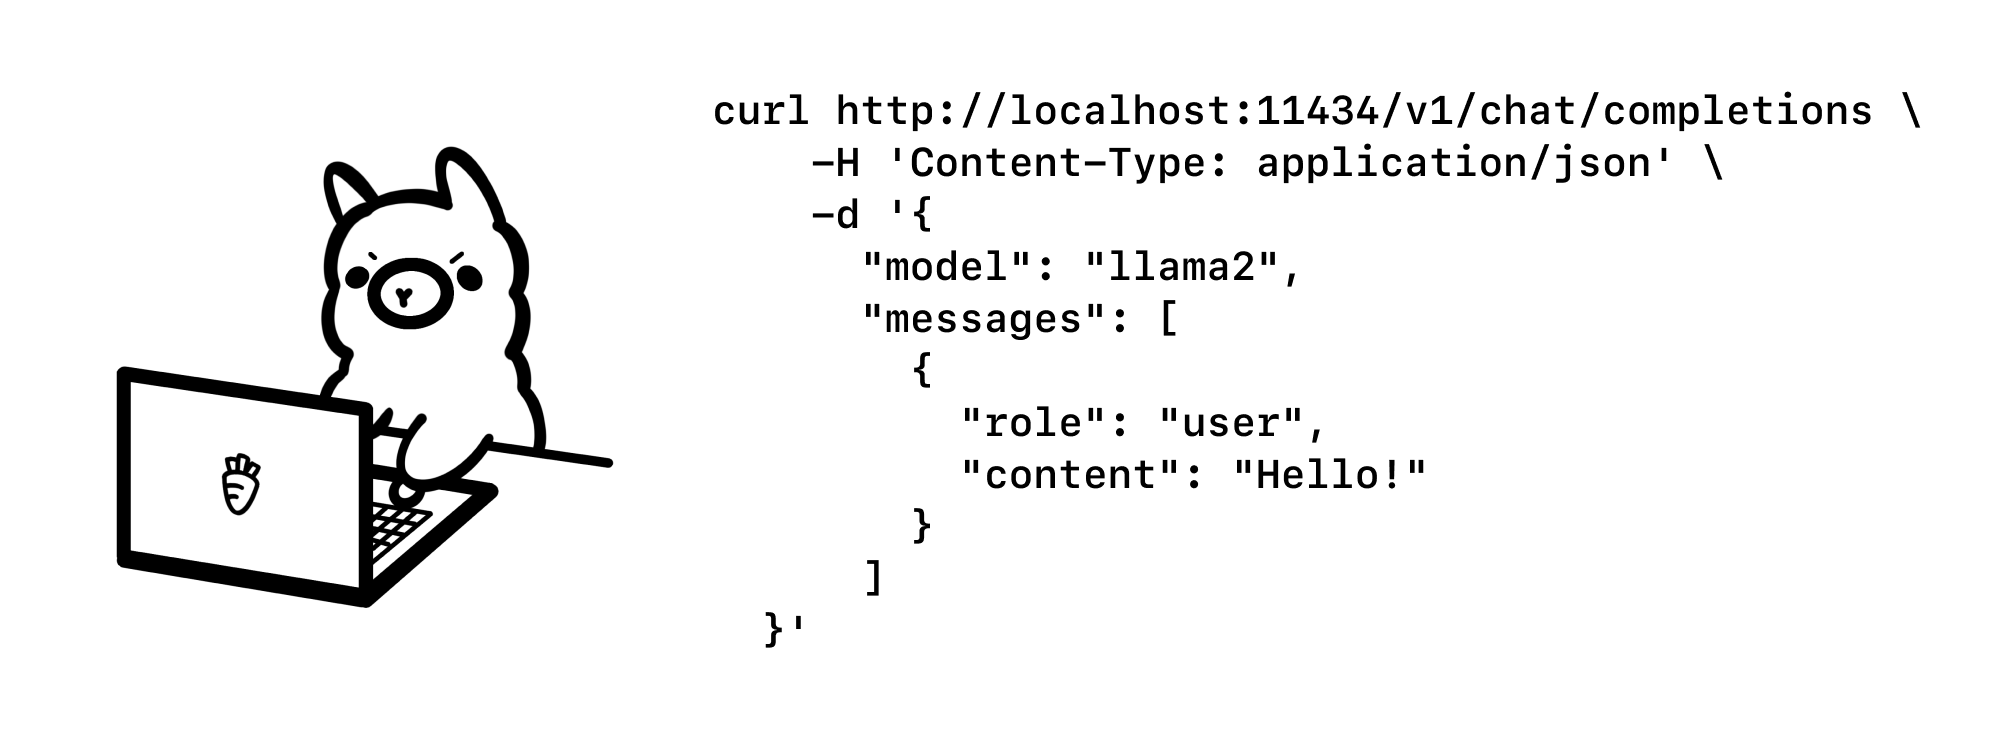
Let’s understand the API endpoint that is exposed by Ollama environment and invoke our model with a prompt via curl. This will help us create a mental model of what it means to configure inside of our application.
Assuming that you have the curl utility on your machine or any of the API clients (I like Bruno), we can hit the Ollama API endpoint for our model as given below:
Notice that we are providing the following parameters. This results in the following output. Make sure Ollama is running.
Do refer to the API documentation for more endpoints and multiple other parameters that you can provide while working with the model.
We are now at the final stage and which is all about modifying our code to use the local LLMs that we have configured. I am going to use the same application that we utilized in Part 3, where there is a human and autonomous agent interaction. The human asks for a quote, the agent returns back one and the human reviews it, says ok or asks for another quote.
All we need to do now is to modify the Autonomous Agent configuration i.e. while instantiating the ConversableAgent class to use the local LLM list instead of the Google Gemini list that we had configured earlier.
The entire code listing is shown below:
Notice in the code that we are configuring a local list of the LLM and the endpoint in the config_list_local_llm variable. The rest of the code remains the same. If you run the application, it's as before, except that the LLM is now served locally.

You can experiment with other prompts and local models available through Ollama that meet your requirements.
This concludes Part 4 of the series, where we saw how we can configure a local LLM via Ollama and use that in the Autogen framework. In the next parts, I will cover a few different conversational patterns. Stay Tuned.